Check our newest product: Freeze Dried Bone Broth!

Free delivery for orders over $125!

Delicious Garlic Parmesean Wings

written by

Bethany Fisher

posted on

May 9, 2025

Garlic-Parm-Blog.png

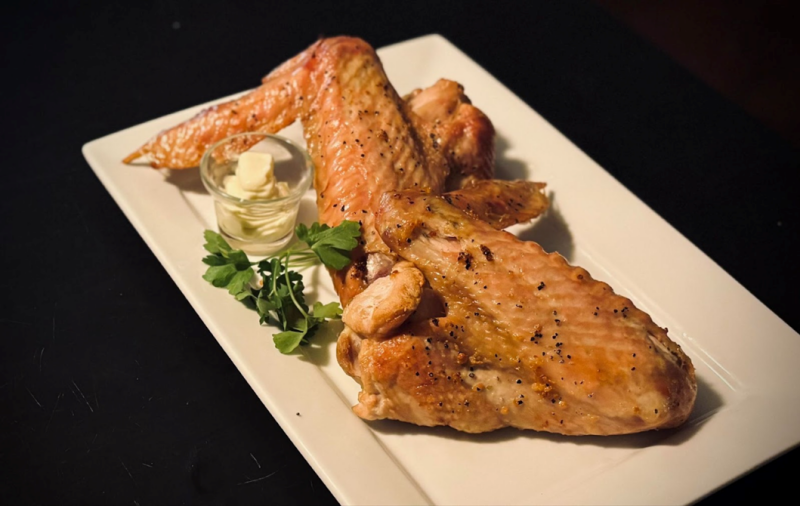
Garlic and parmesan - a match made in heaven. Wings are one of the easiest cuts to prep and absorb so much flavor. This recipe uses turkey wings, which are cheaper and meatier than chicken wings, but you could definitely substitute chicken wings! It takes about 15 minutes total to prep,then you pop them in the oven or on the grill, and dinner is served!

Ingredients:

2ct turkey wings (mine weighed about a lb each)

¼ cup butter, melted

3 cloves garlic, minced

¼ cup finely grated fresh parmesan

Salt and pepper to taste

Parsley (optional, but makes a nice and tasty garnish)

1. Preheat your oven to 400 degrees. Place a wire rack on a baking sheet (necessary to keep the wings off the pan to create airflow, which creates a nice crisp skin - the best part of wings!).

2. Melt your butter over low heat. Then add in your minced garlic and let cook until it is starting to brown and is fragrant. Remove from heat.

3. Pat your wings dry with a paper towel and set on the wire rack. Using a pastry brush, slather your garlic butter all over the wings. Next, sprinkle salt and freshly ground pepper to taste.

4. Place pan on middle rack in oven, and cook for about forty-five minutes to an hour, or until the skin is nice and crispy and the meat comes easily off the bone.

5. Sprinkle the grated parmesan on top of the wings and place back in the oven for a minute to let the cheese melt a bit.

6. Serve with the parsley garnish and whatever sauce you prefer! My favorite to pair these with is a garlic aioli.

~~~~~

I love big, bold flavors, and I love how quick this recipe was to whip up after a day at work. I also like using turkey wings since you don’t need as many to make it a filling meal, and the bonus is they’re cheaper than chicken wings!

A great side dish to serve with these is homemade sweet potato fries, which are super easy to make! You can cook them in the oven with the wings, and they’ll both be done around the same time. Great for saving time and making a well rounded, satisfying meal!

Cheers!

~Bethany

More from the blog

Budget Series: How to Make Healing Bone Broth

If you’re a mama wanting to make sure your kids get the best they can to give them a healthy foundation for living life… Or an individual looking to boost your overall health… Or someone who suffers from health issues and is looking for something to give your body a break and a chance to heal… Then this is the post for you! Pasture-raised chicken (or any meat) that is fed a diet free from chemicals and preservatives, that can forage for added nutrition from bugs and grass, that has continual access to clean living spaces, water, sunlight, and fresh air - all this will produce a bird that is much higher in all the nutrients you want your bone broth to be rich in. It will also have a balanced omega 3-6 ratio, so the fats will actually be healthy and beneficial rather than detrimental. As the last part of our budget series on cooking whole chickens, I’ll walk you through how to make a healing bone broth out of the nutrient-dense bones, joints, and skin you are left with after cooking a whole chicken. It’s an absolute powerhouse of nutrition! The bones contain trace minerals, and the skin and joints are rich in collagen, amino acids, protein, etc.! And the best part is you can make this healing broth with almost no effort from yourself! Just stick it in a crockpot or stock pot on the stove and let the magic begin. How to Make Healing Bone Broth: Ingredients: 1 chicken carcass or 2 chicken backs (if you are making broth from bones you save after cooking a whole chicken, make sure you save EVERYTHING - the skin, joints, cartilage, and bones!) Enough water to cover the bones by about an inch 1 tsp salt (optional) Herbs, veggies, or garlic (optional) Directions: Place your chicken carcass in the crockpot or stock pot, then cover with water so there’s about an inch of water above the bones (some will simmer off as it cooks). Then add in any salt, herbs, veggies, or garlic to add some flavor. If using a crockpot, turn the settings to low. If you are using a stock pot, bring to a simmer and then turn the burner to low. Then let it cook for at least 16 hours. To get all the healing benefits, it takes at least that much time for the bones and cartilage to break down and release their nutrients into the broth. If you can, go longer and cook it for 24 hours. After 16-20 hours, strain into a jar. Don’t skim off the fat that rises to the top - that fat is full of health benefits and will coat your digestive track, soothing it. And there you have it! You have one of the most nutrient dense foods right at your fingertips with very little time invested from you. I love just adding a little salt and drinking the broth as it is, or using it as a base for sauces and soups. As someone who has digestive and joint issues, I can attest to the benefits that bone broth provides. More energy, healthier skin, less joint pain, a soothed tummy, and the list goes on. Next up on the blog, we’ll be doing a series of tips and tricks from Liz Straight on budgeting time and money to feed a family of ten using pasture-raised food. Stay tuned! Cheers! Bethany

Budget Series: 3 Ways to Use a Whole Chicken (Part 2)

Next up on this budget series, we’ll learn how to roast a chicken in a crockpot. This super easy way of cooking a chicken will ensure dinner is on the table without any hassle for you! Easy Crock pot Chicken: Ingredients: 1 whole chicken (I used a 6lb chicken - the bigger you go, the more meat you get out of it for about the same amount of time put into prepping it) Salt and pepper, to taste Optional: herbs, garlic, onion, etc. Get creative! Directions: 1. Place the chicken into a large crockpot. For the 6lb chicken, I used an 8 quart crock pot. Just enough space! Add any seasonings or herbs your heart desires. No need to add water - the chicken will release water as it cooks! 2. Turn the settings to low. 3. And let it cook for six hours or until the internal temp of the thigh is 165! Carve and serve with some gravy or bbq, or shred it to use in other recipes. ***For a whole chicken, the rule of thumb is about an hour per pound of chicken on the low setting. And if you’re like me and you forget to pull out your chicken to thaw ahead of time, add a half an hour per pound to that. But as always, go by temp instead of time to make sure you don’t get a dry chicken! It really is that easy. I made this chicken to prep for writing this blog post yesterday. I was at work, doing my work for the day and also prepping to leave for a week’s visit home to MN over Father’s Day. When I went to get my chicken to cook it, it was actually still mostly frozen. I had planned for it to be thawed, but I had forgotten to pull it out in time. Oh well, I popped it into the crockpot and just hoped for the best in the middle of a chaotic day. The day was super busy - packing orders to go out on deliveries the next day, processing chickens, and getting everything planned ahead of time for while I’m away on vacation, plus all my normal daily work. Then right after work I had to meet someone in town. Then back to the farm to finish prep for deliveries tomorrow and wrap up any loose ends. Then out to my garden to water and make the plants happy. Then back home to pack, do laundry, clean, and get ready to head out in the morning. And after all that? Dinner, ready and waiting for me in my crockpot. It took about nine hours for the frozen six pound chicken to fully cook, and I didn’t even have to think about it. I shredded some, made a sourdough sandwich, then put the rest into the freezer for while I’m out of town. There you have it! Crockpot chicken for a busy gal’s or guy’s life. It’ll be your best friend! Pro tip: Get a timer for your outlet to plug your crockpot into! Then you can set the timer for when you want it to start and end cooking. That way it’s done when you have time to take care of it. Drop a comment below and let me know how it goes for you! Cheers! ~Bethany